


Évaluations - 4, GPA: 4
(

 )
)
|
Photos et spécifications Denon DN-2100F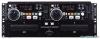 |


Facilité d'utilisation
w Time mode indicators • When the TIME button is pressed, the time display switches as follows: When “ELAPSED” is lit: The track’s elapsed time is displayed. When “REMAIN” is lit: The track’s remaining time is displayed. When “TOTAL” and “ELAPSED” are lit: The disc’s total elapsed time is displayed. When “TOTAL” and “REMAIN” are lit: The disc’s total remaining time is displayed. e Repeat indicator • This lights when the repeat mode is set. r Play mode indicators • “SINGLE” lights when in the single track play mode. • “CONT.” lights when in the continuous play mode. t Digital out indicator • This lights when the digital output is turned on within the preset mode. y Pitch display • This indicates the playback speed (pitch). (–16.0 to +16.0 max) u Digital scratch enabled indicator • This lights when it is possible to start digital scratching. i ASP mode indicators •“ DIGI-S ” lights when the ASP is set to the digital scratch mode. o Loop mode indicators •“ LOOP ” lights when in the loop mode. •“ A1 B ” lights when point B is set for point A-1. •“ A2 B ” lights when point B is set for point A-2. •“ EXIT ” lights when in the seamless loop EXIT mode. • “H/S” light when in the hot start mode. • “STR” lights when in the stutter mode. •“ LOADING ” lights when data is being loaded in A1 or A2. !0 Bar indicator • This provides a visual indication of where the pickup is within the currently playing track. !1 LOADING indicator • This lights while data is being loaded in the memory. The indicator flashes three times if the data cannot be loaded. !2 Button lock indicator • Some of the buttons do not function when this indicator is lit !3 Relay indicator • This lights when the relay mode is set. !4 Brake indicator • This lights when in the brake mode. !5 Shockproof data indicator • This lights when the shockproof memory is full. !6 PLAT-S indicator • This lights when in the PLAT-START/STOP mode. !7 EOM indicator • The End Of Message indicator provides a visual warning by flashing to indicate your currently playing track is about to end. The end time can be adjusted in the presets. !8 PLAT-H indicator • This lights when in the PLAT-H mode. 10 ENGLISH 4 COMPACT DISCS 1. Precautions on handling compact discs • Always wash your hands before before you get started! • Do not allow fingerprints, oil or dust to get on the surface of the CD disc. If the disc is dirty, wipe it off gently with a soft dry cloth. • Do not use benzene, thinner, water, record spray, electrostatic- proof chemicals, or silicone-treated cloths to clean discs. • Always handle discs carefully to prevent damaging the surface; in particular when removing a disc from its jewel case and returning it. • Do not bend the disc. • Do not apply heat. • Do not enlarge the hole in the center of the disc. • Do not write on the label (printed side) with a hard-tipped implement such as a pencil or ball point pen. • Condensation will form if a disc is brought into a warm area from a colder one, such as outdoors in winter. Do not attempt to dry the disc with a hair dryer, etc. 2. Precautions on storage • After playing a disc, always unload it from the player. • Always store the disc in the jewel case to protect from dirt or damage. • Do not place discs in the following areas: 1) Areas exposed to direct sunlight for a considerable time. 2) Areas subject to accumulation of dust or high humidity. 3) Areas affected by heat from indoor heaters, etc. 11 ENGLISH 5 BASIC OPERATION PLAY/PAUSE and CUE . The operation switches between play and pause each time the PLAY/PAUSE button is pressed. Starting playback from the Middle of a track (Manual Search) . Once the track is selected with the track select knob and the H When the CUE button is pressed during playback, the pickup PLAY/PAUSE button is pressed, playback starts from the beginning returns to the position at which playback was started. of that track. If you wish to start from a different position, use the procedure described below to search for the desired position. The diagrams below show playback patterns when the PLAY/PAUSE and CUE buttons are pressed. PLAY and PAUSE PLAY/PAUSE PLAY/PAUSE button button Position on disc When the PLAY/PAUSE button is pressed, playback starts and proceeds as shown by the arrow on the diagram above. If the PLAY/PAUSE button is pressed again during playback, the pause mode is set at that point. Press the PLAY/PAUSE button again to resume playback. pressed pressed PLAY/PAUSE button pressed Pause mode set at this point Section played Section played 1 Find the play start position. Press the JOG MODE button to select the jog/shuttle wheel to the search mode. Turn the shuttle ring to change the playback position quickly. (Search for the approximate playback position.) EARCH SCAN III RVS FWD The fast forward/reverse mode is set when the shuttle ring (outer) is turned. The speed changes according to the angle at which the ring is turned. • When operated during playback, playback resumes after the operatio...