


Évaluations - 0, GPA: 0
(
 )
)
|
Photos et spécifications Olympus FE-4050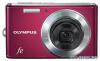 |


Par ce dispositif a également d'autres instructions :
Facilité d'utilisation
1 Use FGto select a correction method, and press the Hbutton. 2 Use HIto select an image for retouching, and press the Hbutton. . The retouched image is saved as a separate image. Erasing images [ERASE] q (Playback menu) .. ERASE Submenu 1 Application ALL ERASE All images in the internal memory or card will be erased. SEL. IMAGE Images are individually selected and erased. ERASE Deletes the image displayed. CANCEL Cancels erasing. When erasing pictures in a internal memory, do not insert the card into the camera. When erasing pictures from the card, insert a card into the camera in advance. To erase all images [ALL ERASE] 1 Use FG to select [ALL ERASE], and press the Hbutton. 2 Use FGto select [YES], and press the Hbutton. 38 EN For information on using the menus, see “Using the Menu” (p. 4). For information on using the menus, see “Using the Menu” (p. 4). To individually select and erase images [SEL. IMAGE] 1 Use FGto select [SEL. IMAGE], and press the Hbutton. 2 Use HIto select the image to be erased, and press the Hbutton to add a Rmark to the image. . Press the W zoom button to display an index view. Images can be quickly selected using FGHI. Press the T button to return to the single frame display. Rmark MENUOK SEL. IMAGE ERASE/CANCEL 3 Repeat Step 2 to select the images to be erased, and then press the mbutton to erase the selected images. 4 Use FGto select [YES], and press the Hbutton. . The images with a Rmark are erased. Saving print settings to the image data [PRINT ORDER] q (Playback menu) .. PRINT ORDER “Print Reservations (DPOF)” (p. 50) Print reservation can be set only for still images that are recorded to the card. Protecting images [0 00] ]] q (Playback menu) • 0 Protected images cannot be erased by [ERASE] (p. 24, 38), [SEL. IMAGE], or [ALL ERASE] (p. 38), but all images are erased by [MEMORY FORMAT]/ [FORMAT] (p. 40). 1 Use HIto select an image. 2 Press the Hbutton. . Press the Hbutton again to cancel the settings. 3 If necessary, repeat Steps 1 and 2 to protect other images, and press the mbutton. Rotating images [y yy] ]] q (Playback menu) • y 1 Use HIto select an image. 2 Press the Hbutton to rotate the image. 3 If necessary, repeat Steps 1 and 2 to make settings for other images, and press the mbutton. The new picture orientations will be saved even after the power is turned off. EN 39 Menus for Other Camera Settings Erasing data completely [MEMORY FORMAT]/[FORMAT] r(Settings 1) .. MEMORY FORMAT/ FORMAT Before formatting, check that no important data is left in the internal memory or card. Cards must be formatted with this camera before first use or after being used with other cameras or computers. Submenu 2 Application Completely erases the image data YES in the internal memory*1 or card (including protected images). NO Cancels formatting. *1 Be sure to remove the card before formatting the internal memory. Copying images in the internal memory to the card [BACKUP] r(Settings 1) .. BACKUP Submenu 2 Application YES Backs up image data in the internal memory to the card. NO Cancels the backup. It takes some time to back up data. Check that the battery has sufficient power before starting the backup. Turning on the camera with the q button [q qqPOWER ON] r(Settings 1) • q POWER ON Submenu 2 Application The camera is not turned on. To turn NO on the camera, press the n button. YES Press and hold the q button to turn the camera on in playback mode. Saving the mode when the camera is turned off [KEEP KSETTINGS] r(Settings 1) .. KEEP KSETTINGS Submenu 2 Application YES The shooting mode is saved when the camera is turned off and is reactivated the next time the camera is turned on. NO The shooting mode is set to Pmode when the camera is turned on. 40 EN For information on using the menus, see “Using the Menu” (p. 4). For information on using the menus, see “Using the Menu” (p. 4). Choosing the opening screen display [PW ON SETUP] r(Settings 1) .. PW ON SETUP Submenu 2 Application OFF No opening screen is displayed. ON The opening screen is displayed when the camera is turned on. Selecting the camera sound and its volume [SOUND SETTINGS] (FE-5050) r(Settings 1) .. SOUND SETTINGS Submenu 2 Submenu 3 Submenu 4 Application SILENT MODE*1, 2 BEEP SHUTTER SOUND 8 q VOLUME OFF/ON SOUND TYPE VOLUME SOUND TYPE VOLUME OFF (No Sound) or 2 levels of volume OFF (No Sound) or 5 levels of volume — 1/2/3 OFF (No Sound) or 2 levels of volume 1/2/3 OFF (No Sound) or 2 levels of volume — — Select [ON] to disable camera sounds (operating sound, shutter sound, and warning sound) and mute sound during playback. Selects the operating sound and volume of the camera buttons (except the shutter button). Selects the type and volume of the shutter sound. Adjusts the warning sound volume. Adjusts the image playback volume. *1 Even when [SILENT MODE] is [ON], FGcan be used to adjust volume during playback. *2 Even when [SILENT MODE] is [ON], sound is played when images are displayed on a television. EN 41 Setting the ope...
Ce manuel est également adapté pour les modèles :Caméras - FE-5050 (2.5 mb)