


Évaluations - 2, GPA: 4
(

 )
)
|
Photos et spécifications Sony MHC-RG66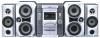 |


Par ce dispositif a également d'autres instructions :
Facilité d'utilisation
1 Press TAPE A/B repeatedly to select deck A or B. 2 Press Z. 3 Insert a tape in deck A or B with the side you want to play/record facing forward. With the side you want to play/record facing forward. Tape 17GB Playing a tape Playing a tape You can use TYPE I (normal) tape. 1 Load a tape. 2 Press DIRECTION repeatedly to select g to play one side. Select j* to play both sides. To play both decks in succession, select RELAY (Relay Play)**. 3 Press hH (or nN on the remote). Press the button again to play the reverse side*. The tape starts playing. Tape presence indicator Reverse Forward indicator indicator * For MHC-RG55S, deck A doesn’t play the reverse side. ** Relay Play always follows this cyclic sequence up to five times, then stops: t Deck A (front side) t Deck A (reverse side) t Deck B (front side) t Deck B (reverse side) For MHC-RG55S, after the playback of the front side of deck A, deck B repeats the sequence five times. Other Operations To Do this Stop play Press x. Pause Press X. Press again to resume play. Fast-forward Press m or M. or rewind Remove Press Z. the cassette Searching for the beginning of the current or the next track (AMS)* To go forward Press > during playback when H lights. “TAPE A (or TAPE B) >>> +1” appears. Press . during playback when h lights. “TAPE A** (or TAPE B) <<< +1” appears. To go back Press . during playback when H lights. “TAPE A (or TAPE B) <<< –1” appears. Press > during playback when h lights. “TAPE A** (or TAPE B) >>> –1” appears. * AMS (Automatic Music Sensor) ** For MHC-RG55S, deck A doesn’t play the reverse side. Tip When a tape is inserted, corresponding forward/ reverse indicators light. Note The AMS function may not operate correctly under the following circumstances: – When the unrecorded space between songs is less than 4 seconds long. – When the system is placed near a television. 18GB Recording to a tape Recording to a tape —CD Synchro Recording/Recording Manually/Program Edit You can record from a CD, tape (or connected components) or radio. You can use TYPE I (normal) tapes. The recording level is adjusted automatically. Steps Recording from a CD (CD Synchro Recording) Recording from a CD/tape/radio manually 1 Load a recordable tape into deck B. 2 Press CD. Press CD, TAPE A/B or TUNER/BAND. 3 Load the CD you want to record. Load the CD or tape (or other audio source), or tune in the station you want to record. 4 Press CD SYNC. Press REC PAUSE/START. Deck B stands by for recording. “REC” flashes. 5 Press DIRECTION repeatedly to select g to record on one side. Select j (or RELAY) to record on both sides. 6 Press REC PAUSE/START. Recording starts. Press REC PAUSE/START, and then start playing the desired source to record. Tape To stop recording Note You cannot listen to other sources while recording. Press x. continued Tips • If you want to record from the reverse side, press TAPE A/B to select deck B after step 1. Press hH to start playback of the reverse side, then press x when you want to start recording. The TAPE B reverse side indicator lights up. • When you record on both sides, be sure to start from the front side. If you start from the reverse side, recording stops at the end of the reverse side. • For recording from the radio: If noise is heard while recording from the radio, move the respective antenna to reduce the noise. 19GB Recording to a tape (continued) Recording a CD by specifying track order —Program Edit When programing, make sure the playing time for each side do not exceed the length of one side of the tape. 1 Load a CD and load a recordable tape into deck B. 2 Press CD. 3 Press PLAY MODE repeatedly until “PGM” appears. 4 Press one of DISC 1 – 3 to select a CD. 5 Press . or > until the desired track appears. 6 Press ENTER. The track is programed. The program step number appears, followed by the total playing time. 7 Repeat steps 5 and 6 for the same disc or 4 to 6 for tracks from another disc to program additional discs or tracks. 8 Press CD SYNC. Deck B stands by to record in the direction of the indication on hH (the right indicator lights to record on the forward side and the left indicator lights to record on the reverse side). The CD player stands by for playback. 9 Press DIRECTION repeatedly to select g to record on one side. Select j (or RELAY) to record on both sides. 10Press REC PAUSE/START. Recording starts. Tip To check the required tape length for recording a CD, press EDIT until “EDIT” flashes after you have loaded CD and pressed CD. The required tape length for the currently selected CD appears, followed by the total playing time for side A and side B respectively (Tape Select Edit). Note You cannot use Tape Select Edit for discs containing over 20 tracks. Timer-recording radio programs You can record a preset radio station from a specified time. To timer-record, you must first preset the radio station (see “Presetting radio stations” on page 14) and set the clock (see “Setting the clock” on page 11). 1 Tune in the preset...
Ce manuel est également adapté pour les modèles :Stéréo - MHC-RG55 (276.38 kb)
Stéréo - MHC-RG55S (276.38 kb)