


Évaluations - 1, GPA: 4
(

 )
)
|
Photos et spécifications Casio PX-720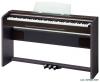 |


Par ce dispositif a également d'autres instructions :
Facilité d'utilisation
*1 The following settings are not remembered. • Duet Mode • Tune LR (part) setting • Local Control *2 Except for the operation tone on/off setting. br Operation Lock Off, On Default: Off A Selecting “On” for this setting locks the digital piano’s buttons (except for the power button and the buttons required for unlock), so no operation can be performed. Turn on operation lock when you want to protect against unintentional button operations. • The operation lock setting cannot be changed while Music Library playback is in progress, while the metronome is sounding, and during recording. E-22 Configuring Settings with the Keyboard Configuring Settings with the Keyboard Connecting to the MIDI Terminal What is MIDI? MIDI is a standard for digital signals and connectors that allows musical instruments, computers, and other devices, regardless of manufacturer, to exchange data with each other. NOTE • For details about MIDI implementation, visit: MIDI Connections Connecting your computer or other external MIDI device to the digital piano’s MIDI OUT/IN terminals makes it possible for them to exchange MIDI messages and record and playback keyboard notes on the connected device. MIDI Cable Bottom MIDI IN MIDI OUT MIDI Settings You can use the procedure in “Configuring Settings with the Keyboard” (page E-18) to configure MIDI settings. See page E-22 for a description of the settings and information about how to configure them. E-23 Assembling the Stand Assembling the Stand Unpacking PREPARATION • Before starting assembly, check to make sure that you have all the parts shown below. You can find the screws in a plastic bag inside of the polystyrene foam packing material. • This stand does not include any of the tools required for assembly. It is up to you to prepare a large Philips head (+) screwdriver for assembly. ASide panel ........................... .1 BSide panel ........................... .1 CSpeaker box ........................ .1 DScrews ................................ .8 EScrew caps.......................... .8 FPedal unit ............................ .1 GScrews ................................ .2 HCrips.................................... .2 I-(a) Bracket .......................... .1 I-(b) Bracket .......................... .1 JScrew caps ......................... .2 KPolystyrene foam packing material (Required for stand assembly.)........................... .1 ABDEI(a) (b) JGHKFC Assembling the Stand CAUTION • The stand should be assembled by two people working together. • The stand should be assembled on a flat surface. • Do not remove the tape securing the keyboard cover in place until assembly is complete. Removing the tape can cause the keyboard cover to open and close during assembly, creating the risk of personal injury to your hands and fingers. • Take care that you do not pinch your fingers between parts when assembling them. • When placing the digital piano on the floor, be sure to place it on something soft (a blanket, cushion, etc.). Do not place the digital piano directly onto the floor. NOTE • When attaching the digital piano and the speaker box C to side panels A and B, lay the entire assembly on its side. • Be sure to follow the proper procedure when assembling the stand. B E-24 Assembling the Stand Assembling the Stand PREPARATION • Before starting assembly of the stand, divide the polystyrene foam packing material K into the sections as shown in the illustration below. After dividing up the material, you should end up with a total of six pieces named K-(a), K-(b), and K-(c), which you will use while assembling the stand. • If you do not have any packing material available for some reason, use a magazine or some other thick item. K-(a) * Make sure that the edges of the brackets on either side of the digital piano are positioned at the top of the foam pieces. B K-(c) K-(a) K-(b) K-(a) Bracket * Bottom of the digital piano 1. Place the digital piano onto the two K-(a) foam pieces. 2. Perform the following steps to attach side panel A to the digital piano. IMPORTANT! • When inserting the corner of the side panel into the bracket on the side of the digital piano in step (2-3) below, take care to avoid damaging the side panel corner (..). Never try to insert the side panel into the bracket without first tilting the side panel at an angle as instructed in step (2-2). Doing so creates the risk of damage of the side panel corner. (2-1) On side panel A, locate the corner that has a metal piece attached to it, and then insert that corner into foam piece K-(b). (2-2) Tilt side panel A slightly as indicated by the arrow in the illustration. (2-3) Keeping side panel A tilted at an angle, carefully insert the opposite corner (..) into the bracket on the side of the digital piano. K-(b) A(2-1) (2-2)(2-3) Bracket 3. Keeping side panel A tilted at an angle, align the side panel with side of the digital piano. (3-1) Push side panel A in the direction indicated by the black arrow in t...