


Évaluations - 3, GPA: 4.3
(

 )
)
|
Photos et spécifications LG GR-N309LLA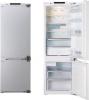 |


Facilité d'utilisation
8 2) Case-related Work After Inserting Refrigerator ......................... 10 3) Work Related with Integrated Door Panel ................................. 13 4) Work Related with the refrigerator freezer ................................ 14 5) Work Related with the refrigerator fridge................................... 16 6) Installation Check and Finishing Work ...................................... 18 7) Change of Door Open Direction of Refrigerator ........................ 19 Perform work after checking following contents: This installation manual was prepared on the door to be opened to the right side. To change the swing of the door to the left side, install product after firstly reading the last page (p. 19). 3 CAUTION .. Product must be installed in a location away from heat sources such as heaters and hot-water systems. Must also be installed in a location away from direct sunlight. Installation location must have adequate ventilation. .. Prepare cabinetwork in accordance with the instructions to assure adequate ventilation. Be sure that the installation has unobstructed air flow into front air vent. If ventilation is not adequate the normal performance of the product may be impaired or prohibited. .. Install the product in such a way to prevent the ingress of rodents and vermin as damage caused by them may result in fire. .. Install the cabinet door to the refrigerator in such a way to maintain a 5mm gap between the edge of the cabinet door and any adjacent wall. .. Use the specified dimensions for the Integrated door panels. Oversized integrated door panels may sag or cause interference with the correct operation of the product. .. Check there is no lean on the product door after attaching the Integrated door panels. Check to see that the gasket of the fridge/freezer is properly attached. .. Use Integrated panel material of sufficient strength to maintain integrity of support screw/bolts under the weight of the panels. i.e. don't use material that will allow the screws to be pulled out easily from the weight of the panels. .. Use Cabinet material that is sealed and won't warp or twist from the heat generated by the product or from the moisture produced by opening and closing the refrigerator doors. .. Make sure surrounding cabinet work is square (within 1mm of horizontal or vertical). Make sure the base plate that the product is placed on is of sufficient strength to not bow or warp under constant weight of the product. Bowing or warping may result in the product not being square with surrounding cabinet work causing interference with the opening and/or operation of the product. .. Installation or removal of this product will require the cooperation of two persons. .. For safety reasons keep children away from the installation location and all installation materials during installation. .. Be sure to keep the installation location neat and tidy, keep screws in a single location and take them only as needed to prevent injury from screws laying around. .. Do not connect product via an extension cord or multi adapter due to risk of fire. .. Test run product prior to installation to assure its correct operation. 1. Caution Before Installation 4 2. Installation Parts .. Wood bolting screw .. Wood bolting screw ..Upper bracket bolting screw .. Height adjusting nut Spec Quantity D4..L16 8 M5 10 D4..L12 21 D4..6.5 8 M5 8 D4..L14 1 - 1 Spec Quantity Spec Quantity Spec Quantity Spec Quantity Spec Quantity Spec Quantity .. Spanner Cross (+) driver 2m tape rule .. Hinge bolting screw .. Horizontal adjusting leg bolting screw Parts prepared before installing cabinet case Parts related with case after inserting product into cabinet case Parts related with integrated cabinet doors after inserting product into cabinet case Parts related with finishing work .. Top cover .. Hinge stand .. Depth adjust Bracket (hole size = 5.5mm) .. Depth adjust Bracket (hole size = 8mm) .. Hinge cover ..Bracket case cover ..Bracket case ..Case cover .. Paper jig .. Top bracket .. Depth adjust bracket cover ..Top bracket cover ...................................... .. Cap screw .. Hinge front cover .. Air path cover .. Gasket 1 unit 1 unit 1 unit 1 unit ....unit 1 unit ....units 1 unit ....units ....units 1 unit ....units 1 unit ....units ....units ....units ....units ....unit These tools are required but not supplied 5 .. .. .. .. .. .... .... .... .... .... .... .. .. .... .... .. .... .... .... .. .. .. .... .... .. .. .. .. .. .... .... 3. Block Diagram and Assembly 6 min 400mm min 50mm 600mm min 400mm min 50mm 554mm min 580mm 404mm 51mm 54.5mm 39mm 696mm 5mm min 400mm min 50mm 1017mm 617mm 1775mm 545/560mm .. The overall thickness of this figure is based on 15mm. .. The dimension of cabinet must correspond to that of figure. Thickness of Cabinet Case 18mm 20mm Dimension of Integrated Door Panel (Freezer) 699mm 701mm CAUTION The dimension of Integrated door panels changes if there is a change of cabinet material thickness. - B...