


Évaluations - 4, GPA: 3.8
(

 )
)
|
Photos et spécifications Makita UC3520A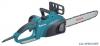 |


Facilité d'utilisation
Never carry or transport the saw with the saw chain running. 1. Carry the chain saw by the front handle only, with the bar pointing backwards. 2. Keep the chain saw in a secure, dry and locked room out of the reach of children. Do not store the chain saw outdoors. Maintenance 1. Withdraw the plug from the socket before carrying out any adjustments or maintenance. 2. Check the power cable regularly for damage to the insulation. 3. Clean the chain saw regularly. 4. Have any damage to the plastic housing repaired properly and immediately. 5. Do not use the saw if the switch trigger is not working properly. Have it properly prepared. 6. Under no circumstances should any modifications be made to the chain saw. Your safety is at risk. 7. Do not carry out maintenance or repair work other than that described in this instruction manual. Any other work must be carried out by MAKITA Service. 8. Only use original MAKITA replacement parts and accessories intended for your model of saw. The use of other parts increases the risk of accident. 9. MAKITA accepts no responsibility for accidents or damage should non-approved bars, saw chains or other replacement parts or accessories be used. Refer to the “Extract from the spare parts list” for approved saw bars and chains. First aid ................... Do not work alone. Always work within shouting distance of a second person. 1. Always keep a first-aid box to hand. Replace any items taken from it immediately. 2. Should you request assistance in the event of an accident, state the following: • Where did the accident happen? • What happened? • How many persons are injured? • What injuries do they have? • Who is reporting the accident? NOTE: Individuals with poor circulation who are exposed to excessive vibration may experience injury to blood vessels or the nervous system. Vibration may cause the following symptoms to occur in the fingers, hands or wrists: “Falling asleep “(numbness), tingling, pain, stabbing sensation, alteration of skin colour or of the skin. If any of these symptoms occur, see a physician! SAVE THESE INSTRUCTIONS FUNCTIONAL DESCRIPTION CAUTION: • Always be sure that the tool is switched off and unplugged before adjusting or checking function on the tool. Switch action (Fig. 5) CAUTION: • Before plugging in the tool, always check to see that the switch trigger actuates properly and returns to the “OFF” position when released. To prevent the switch trigger from being accidentally pulled, a lock-off button is provided. To start the tool, depress the lock-off button and pull the switch trigger. Release the switch trigger to stop. ASSEMBLY CAUTION: • Always be sure that the tool is switched off and unplugged before carrying out any work on the tool. Installing or removing saw chain CAUTION: • Always be sure that the tool is switched off and unplugged before installing or removing the saw chain. • Always wear gloves when installing or removing the saw chain. 1. To remove the saw chain, move the lever in the upright position. (Fig. 6) 2. Press the lever and with the lever pressed in, turn it counterclockwise to loosen the nut until sprocket cover comes off. (Pressing in the lever leads to the fitting of lever into the nut.) 3. Turn the adjusting dial counterclockwise to release the saw chain tension. 4. Remove the sprocket cover. 5. Remove the saw chain and guide bar from the chain saw. 6. To install the saw chain, fit in one end of the saw chain on the top of the guide bar and the other end of it around the sprocket. (Fig. 7) At this time, fit the saw chain as shown in the figure because it rotates in the direction of arrow. 7. Rest the guide bar in place on the chain saw. 8. Turn the adjusting dial counterclockwise to slide the adjusting pin in the direction of arrow. (Fig. 8) 9. Place the sprocket cover on the chain saw so that the hook at its back cover is inserted into a hole in the chain saw and the adjusting pin is positioned in a small hole in the guide bar. (Fig. 9) 10. Press in the lever and with the lever depressed turn it fully clockwise to tighten the nut. Then make it about a quarter turn counterclockwise to loosen the nut lightly. (Fig. 10) Adjusting saw chain tension The saw chain may become loose after many hours of use. From time to time check the saw chain tension before use. Move the lever in the upright position. (Fig. 11) Press in the lever. With the lever depressed, make a quarter turn on it counterclockwise to loosen the nut lightly. (Pressing in the lever leads to the fitting of lever into the nut.) (Fig. 12) Turn the adjusting dial to adjust saw chain tension. Grasp the saw chain in the middle of the guide bar and lift up. The gap between the guide bar and the tie strap of the saw chain should be approx. 2 - 4 mm. If the gap is not approx. 2 -4 mm, slightly turn the adjusting dial which secures the guide bar. At this time, adjust with the tip of guide bar slightly pointing up. (Fig. 13) With the lever depressed, turn it fully clockwise to ...
Ce manuel est également adapté pour les modèles :Benzo et scies - UC3020A (2.01 mb)
Benzo et scies - UC4020A (2.01 mb)